I think we can all agree that window treatments are hard. Between choosing your blinds or shades, picking out the right curtains for your space, and actually installing and hanging everything, getting window treatments just right can be a challenge.
We could spend all day talking about the options and “rules” when it comes to hanging curtains and picking out window treatments, but today I want to focus specifically on how to hang your curtains using drapery pins and ring clips!
Disclaimer: Some links contained in this post are affiliate links. That means that if you click on the link and purchase an item, I get a small percentage of that sale at no extra cost to you. As an Amazon Associate I earn from qualifying purchases. Please know that products and brands recommended here at stay home style are products that I use, love, and trust.

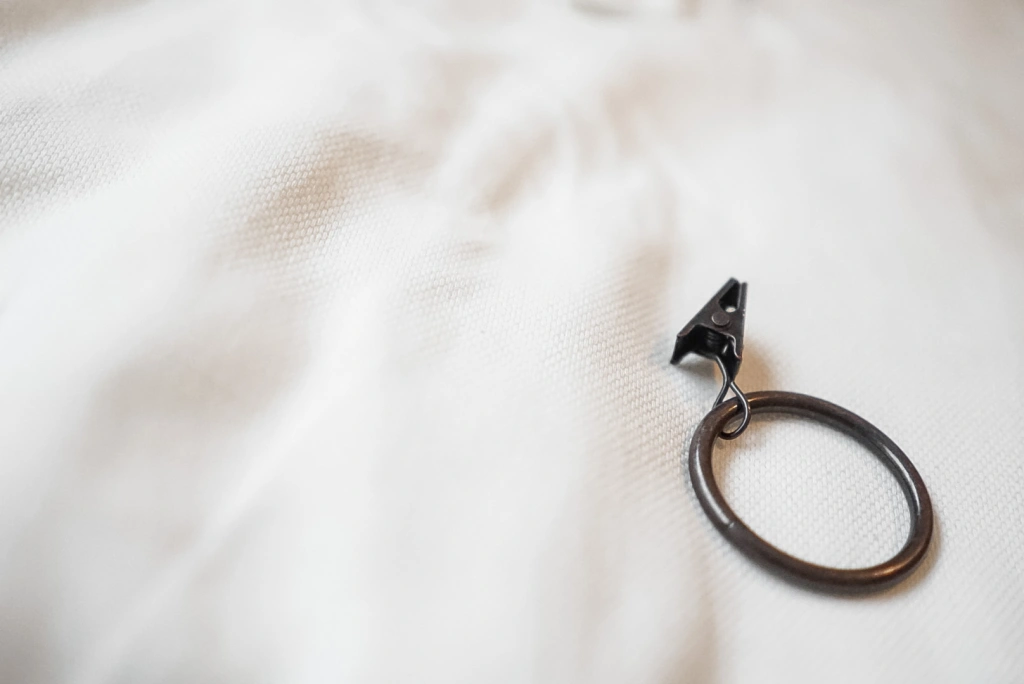
If you’ve ever paid close attention to how designer curtains are hung, you will often notice that they do indeed use rings! What is different about how their rings look vs how a standard ring clip looks, however, is that their rings don’t clip on. Instead, the rings have a small eyelet through which a drapery hook is threaded that allows the curtains to hang from the ring. This way, you only see the ring itself, not how the ring is attached.
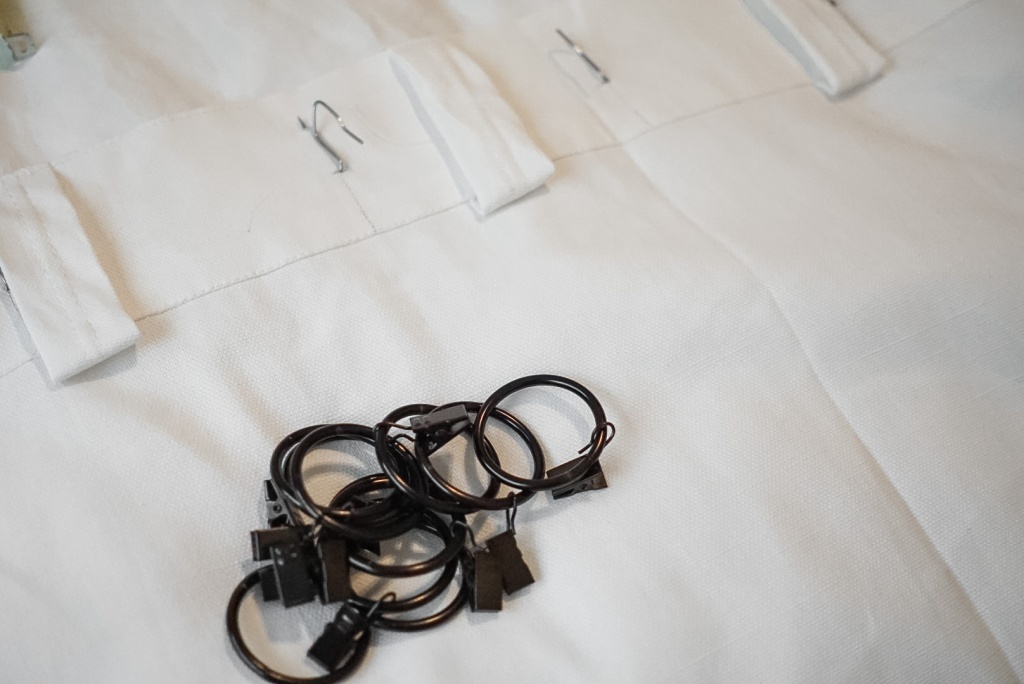
I’m sure most of you have used, or at least seen, ring clips. You can buy them at Target, Amazon, Walmart – you name it! They are easy, cheap, and allow the curtains to easily slide along the rod.
Drapery pins, on the other hand, were something I only stumbled upon recently. To give you a little back story on how I discovered them, I recently got a really good deal on a really expensive Pottery Barn curtain panel ($15 for a $129 curtain panel 😱). I’ll tell you more about that later in the post, BUT, when I got home and opened the curtain, I saw that there were little clear plastic loops across the back of panel. Let me just say, I’ve never had expensive curtains like these before, so I had no idea what they were for at the time. I ended up buying a second panel on eBay, and when it came in, I found a set of drapery hooks inside the package with the curtains. At this point, I was like, SURELY these are what go in the little plastic loops, but how in the world do I use them? So, as anyone would do, I consulted my dear friend Google and found out not only how to use them, but also that they came in a pin form so you can attach them to virtually any curtain panel, not just ones with the fancy loops!
I tried using these pins on both the fancy curtain panels, and just a regular set of rod pocket panels and I was so impressed! They definitely help elevate your space and give you a little bit more of a designer curtain look. Don’t get me wrong, achieving a designer curtain look certainly has A LOT to do with the quality of the curtains themselves, not just how you hang them, but hanging them right can go a LONG way.
In this blog post, I’m going to give you all the details on this super easy hanging method using standard ring clips and drapery pins to give you that designer look on a budget!


WHAT YOU NEED
CLICK ON THE UNDERLINED WORDS TO VIEW PRODUCT LISTINGS
HOW TO GET THE LOOK
1. CHOOSE YOUR CURTAINS

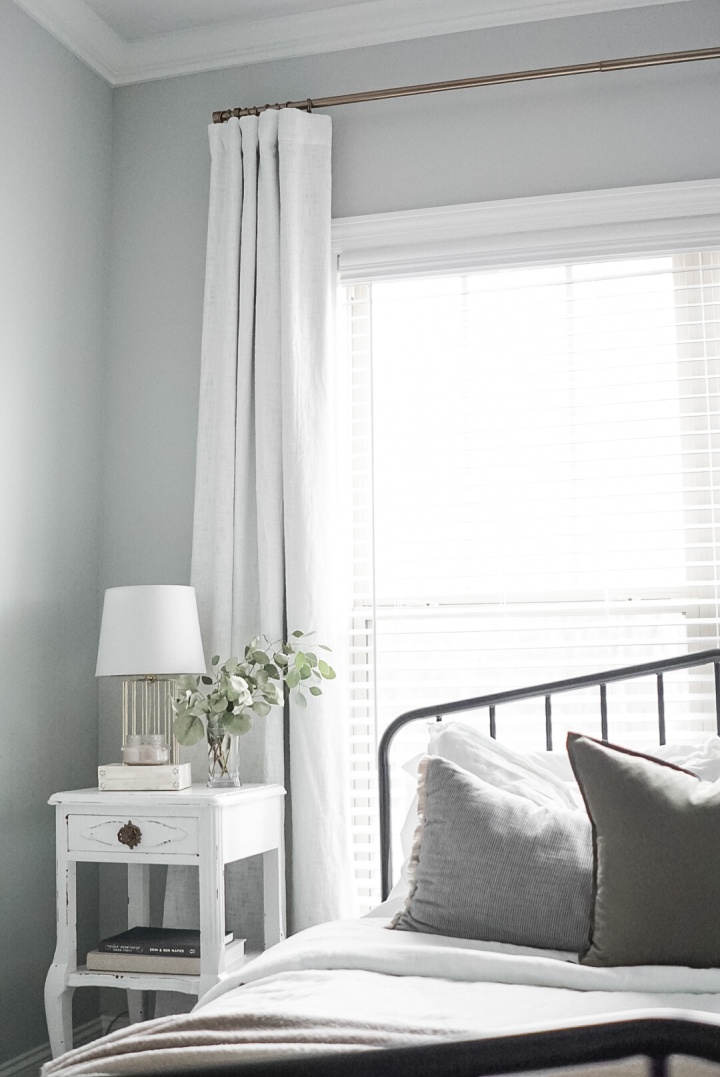
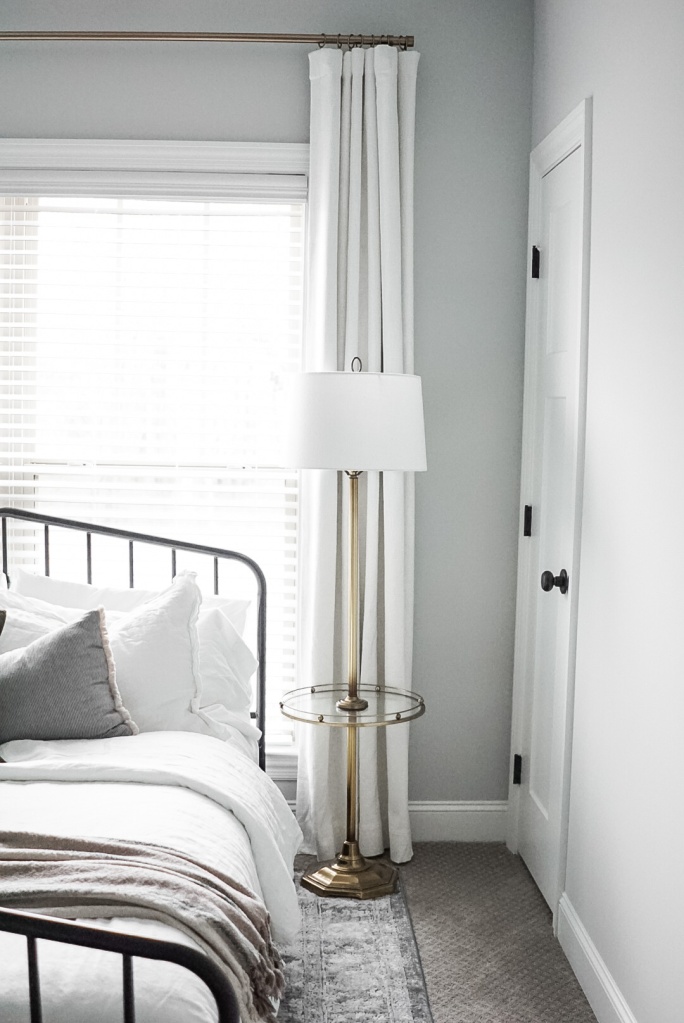
As I mentioned earlier, I have used this hanging method on two different types of curtain panels, so throughout this post you will see pictures of two different sets of curtains and rings. We just got new curtains for our office and guest room, and I took process pictures of putting the rings and pins on the office curtains, but I took styled photos in our guest room (because, as I write this, our office is still in the process of getting a glow up 😆).
Both sets of curtains we used were from Pottery Barn, but the Broadway Curtains we used in the office are much more affordable than the Seaton Curtains we used in the guest room (if purchased at retail price). Our local Pottery Barn went out of business (😭), so during their closing sale, I scored a 96″ Seaton Curtain Panel with a blackout liner for just $14.99. That LITERALLY blew my mind, because this one panel retails for $129 on Pottery Barn’s website. Of course, one panel does me no good on such a large window, so I consulted my go to place for things like this: eBay! I found another 96″ Seaton Panel with a blackout liner for a whopping $85 on eBay. I know, I know, $85 for one panel is A LOT… but I got two of these panels for less than the price of one, so I’m calling it a win. If you’re looking to invest in some really good quality curtains that will last a very long time, I would definitely recommend them! I would also totally recommend the Broadway curtains for a more affordable option. They come in a set of two (which is rare for somewhere like Pottery Barn) and the 96″ set is just $89. They are nice and thick, with a pretty canvas meets linen kind of texture.

Okay now back on subject.
If you don’t already have your curtains, here are a few things to consider.
- You need to choose a curtain that has a pole or rod top. When inserting the drapery pins, you don’t want to see the pin sticking out through the front, so you need two layers of fabric to hide the pin. Stay away from grommet tops and curtains with no pocket or tabs (like drop cloth curtains).
- Choose a length and width that will allow you to hang your curtains high and wide, while still having the curtains just touch the floor (and maybe even pool a little bit). The higher and wider you hang your curtains, the larger and grander your room will feel. If you don’t have crown molding around the top of your walls, I would recommend hanging your rod as close to the ceiling as possible and choosing curtains the length of your ceiling height. If you have thick crown molding like we do, I would recommend choosing curtains 1′ shorter than your ceiling height and hanging your curtain rod as high as you can while still allowing the bottom of your curtains to “kiss” the floor. For example, we have 9′ ceilings with 6″ crown molding, so we hung our curtain rod right around the 8′ mark and used 96″ curtains. If I had 9′ ceilings with no crown molding, I would have hung my rod as close to the ceiling as possible and gotten 108″ curtains. As far as width goes, I think most designers recommend extending the rod 6″-12″ beyond the window on each side to make the window feel larger and to let in as much natural light as possible. Let me add, standard curtain lengths are usually 84″, 96″, and 108″, so based on the assumption that you are choosing between these standard heights, this is how I would choose my curtain length. If you go the custom curtain route, you can hang the curtains as high as you want and have your curtains made to the exact length you need, so I would err on the side of taller is better in that case.
- The thicker and heavier the curtains, the more structure they will have. If you want that sort of accordion fold look that you see with designer curtains, I would try to choose a thicker curtain over something like a sheer.

2. PICK YOUR SPACING AND LAYOUT WHERE YOUR PINS WILL GO WITH A PENCIL

So you have your curtains and supplies, and now it’s time to get to work. Before you start pinning things and poking holes in the fabric, however, you need to make a plan. A good rule of thumb for spacing the pins is 4″-6″ apart, starting at one edge and ending at the other. A lot of times, a curtain like this will have a rod pocket or tab option, and there are generally 7-8 tabs depending on the width of the curtain. As a result, ring clips are often sold in multiples of 7, which, in my case, wasn’t enough for the spacing I chose for this panel. I ended up ordering a couple of extra packs of clips to make sure I had enough, and ended up with a few leftovers. Thankfully, the clips are cheap though, so this was no big deal!
Both the Seaton and Broadway curtains were 50″ wide, but I did a different spacing on each.
The thick Seaton curtains were the fancy ones that already had loops in place for attaching drapery pins. As a result, I just used the spacing that was already given to me (which resulted in using 9 rings).
The Broadway curtains, on the other hand, did not have loops, so I decided to go with a 5″ spacing (which resulted in using 11 rings, because you want to attach one to each end).
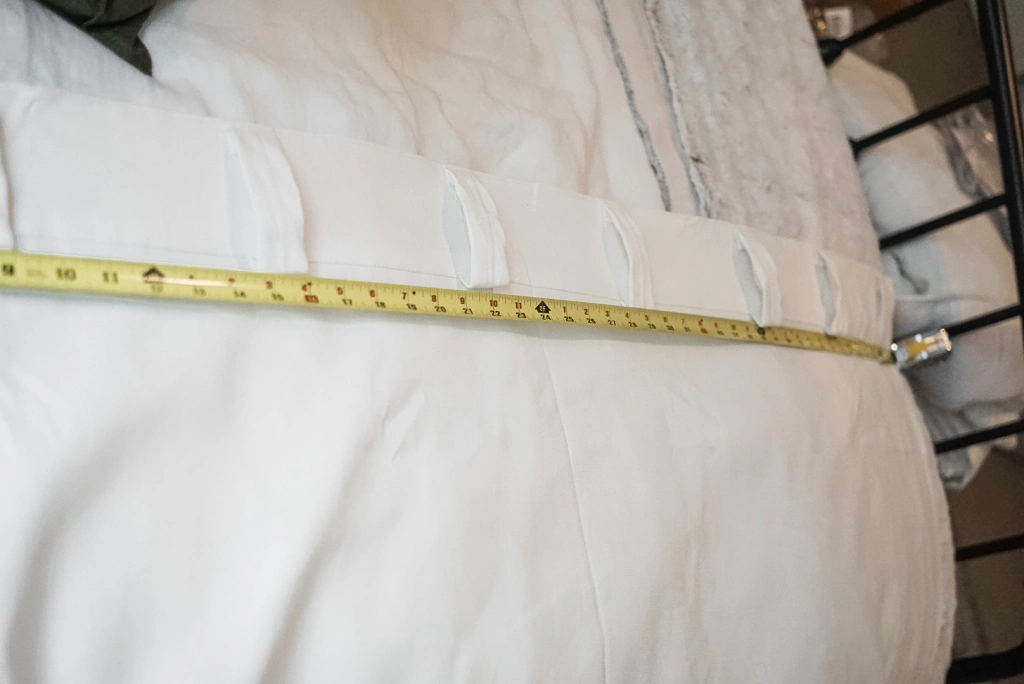
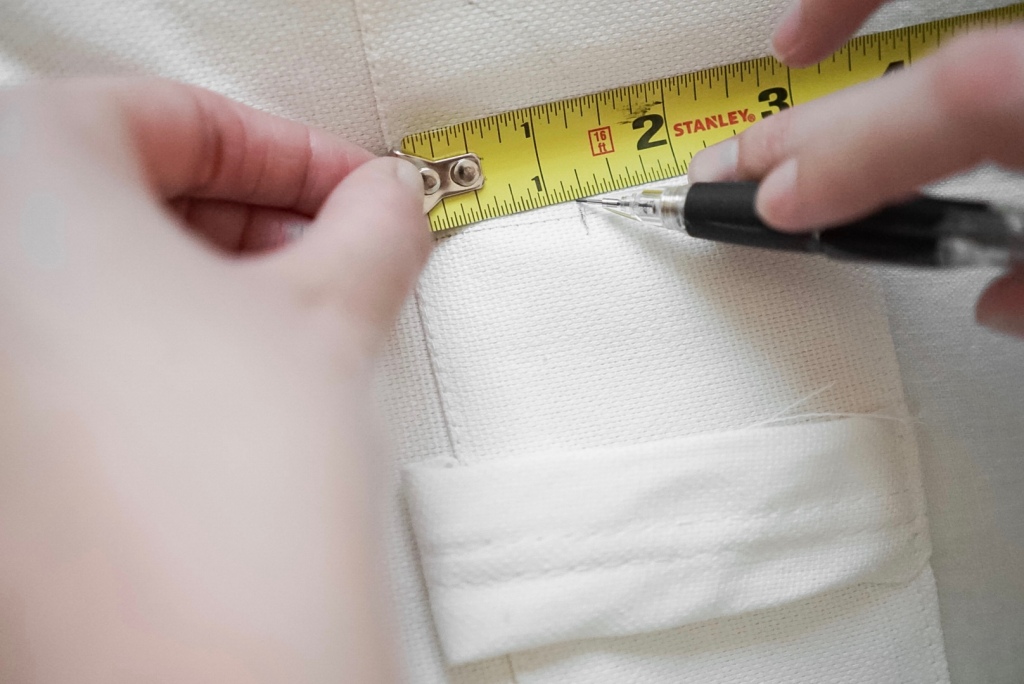
To make inserting the pins quick and easy while keeping things consistent across the panel, make vertical lines at every 5″ (or whatever spacing you chose) from one end of the panel to the other. In addition to these marks, you will want to go through and make horizontal marks over each vertical one denoting 1.25″ up from the bottom of the rod pocket. This is the point at which you should insert the drapery pin. Note, this measurement was based on a rod pocket size of 3.25″. If your pocket is bigger or smaller, you may want to adjust where the pin is inserted. In general, you want to insert the pin low enough that it doesn’t stick out of the top, but high enough that you don’t loose too much length.
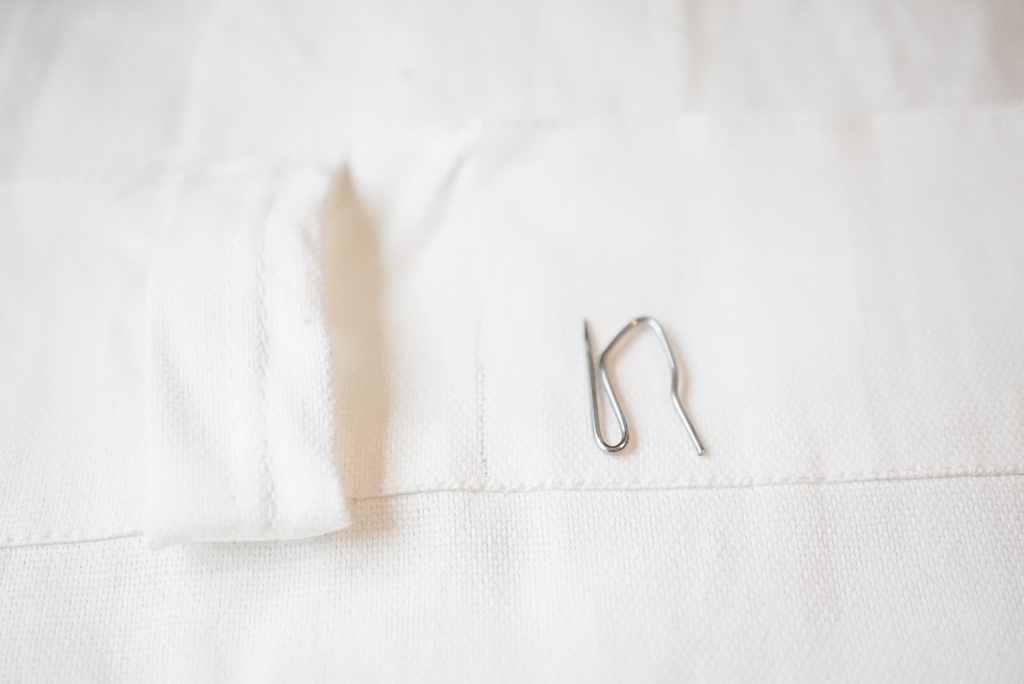
3. INSERT DRAPERY PINS
Once you have your marks on the panel, you are ready to insert the drapery pins! This is pretty straight forward, but you want to make sure that you’re are threading the pin through only the back side of the rod pocket. The easiest way to do this is to separate the pocket by pulling the back away from the front, and weaving the pin in and out of the back of the rod pocket. The pin should be hidden inside of the pocket and should NOT be visible at all from the front.
Also, be careful here. I definitely was rushing and stabbed myself a couple of times in the process!

4. USE PLIERS TO CLOSE THE EYELETS TOGETHER ON THE RING CLIPS


Depending on the type of ring clips you’re using, you may need to use pliers to close the eyelet together. The drapery pins are much thinner than the rings themselves, so if you leave the opening as is, the pin may fall out of the eyelet when you hang it up.
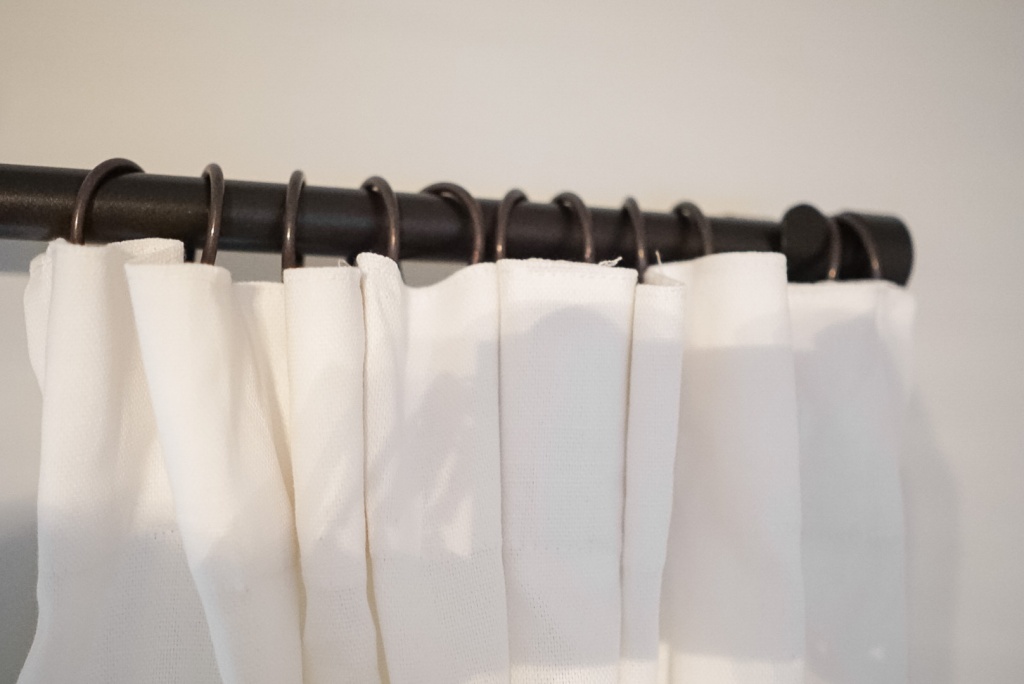
5. THREAD THE PINS THROUGH THE RINGS

Once your rings are ready, all you have to do is thread the pin through the eyelet to attach the ring to the curtain! The trickiest part here is picking up the curtain when you’re finished without all the rings falling off. I would recommend looping the rings over your finger and holding the curtain as it would hang to transport it to the rod, like this ⬇️

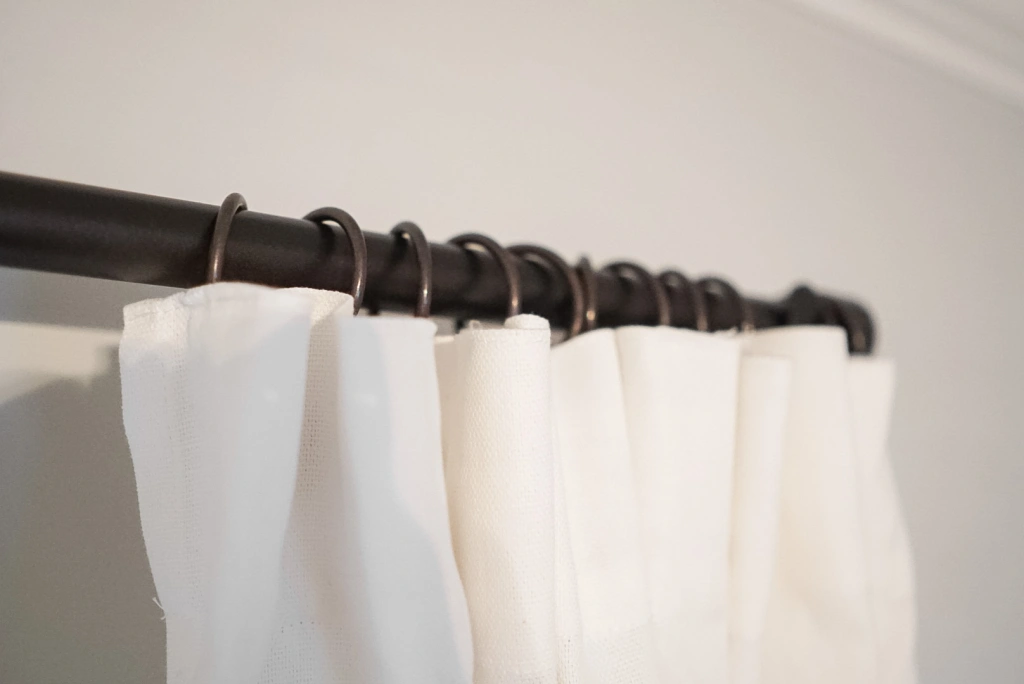
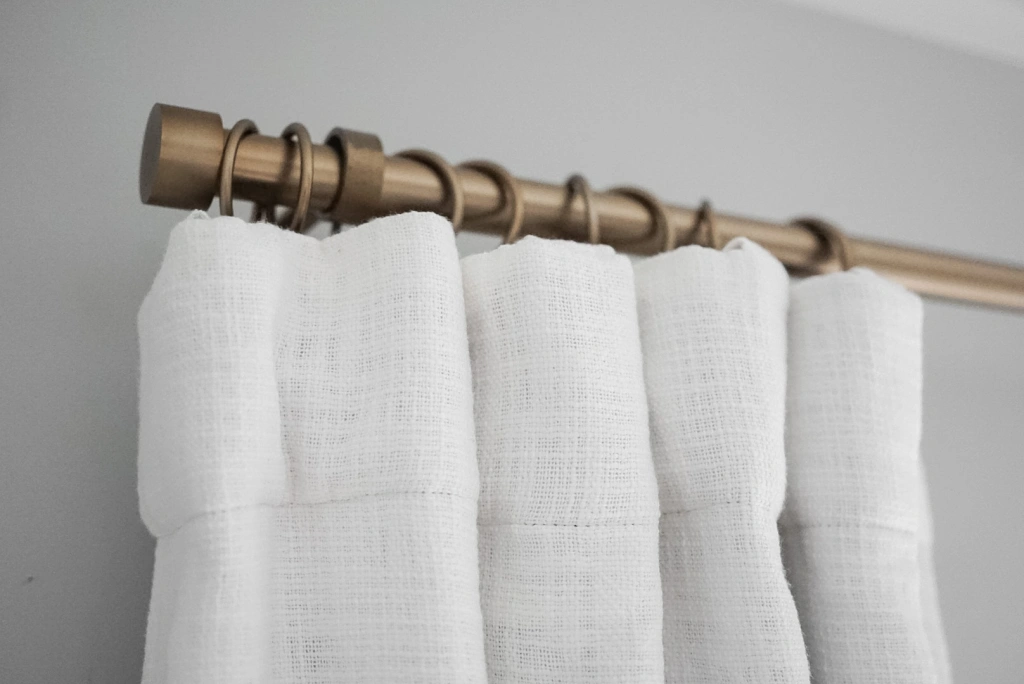
6. HANG THE CURTAIN ON THE ROD

All you have to do from here is hang the curtains on the rod and enjoy the view! I usually slide one or two rings to the side of rod bracket, so the curtains can be pushed all the way to the end. You may have to steam and adjust the curtains to get them to lay just how you like, but once you get them situated, you’re all done!

SHOP
CLICK ON THE NAME OF THE ITEM BELOW EACH IMAGE TO SHOP

Warm Gold Ring Clips (Set of 14) // Black Ring Clips (Set of 14) // Warm Gold Rod // Black Rod // Pottery Barn Seaton Curtain Panel in White (left) // Pottery Barn Broadway Curtains in Ivory – Set of 2 (right)
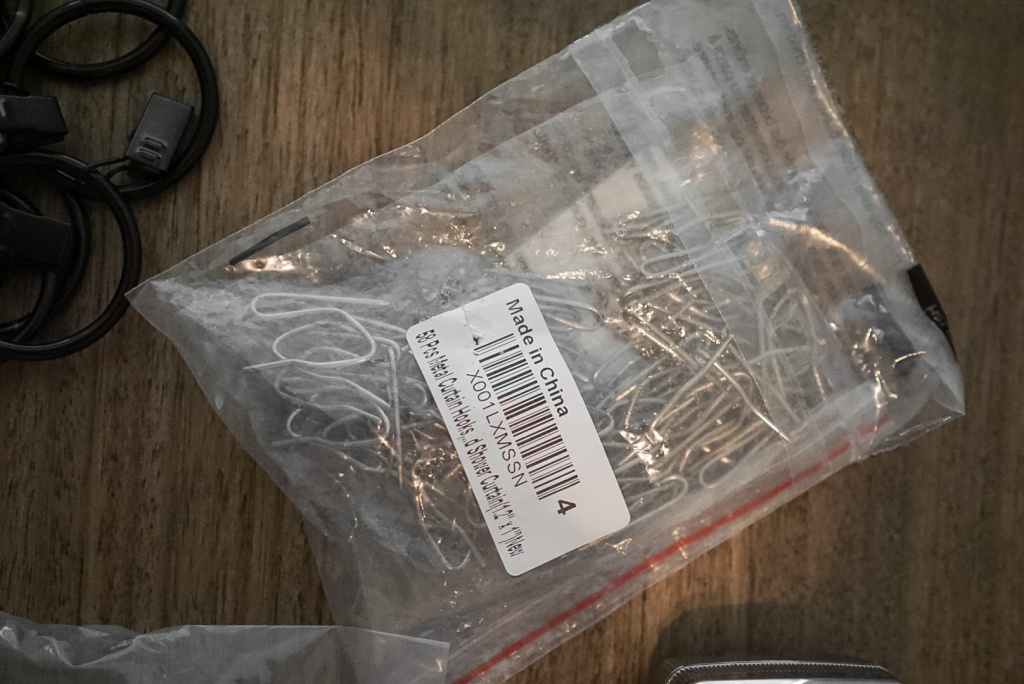
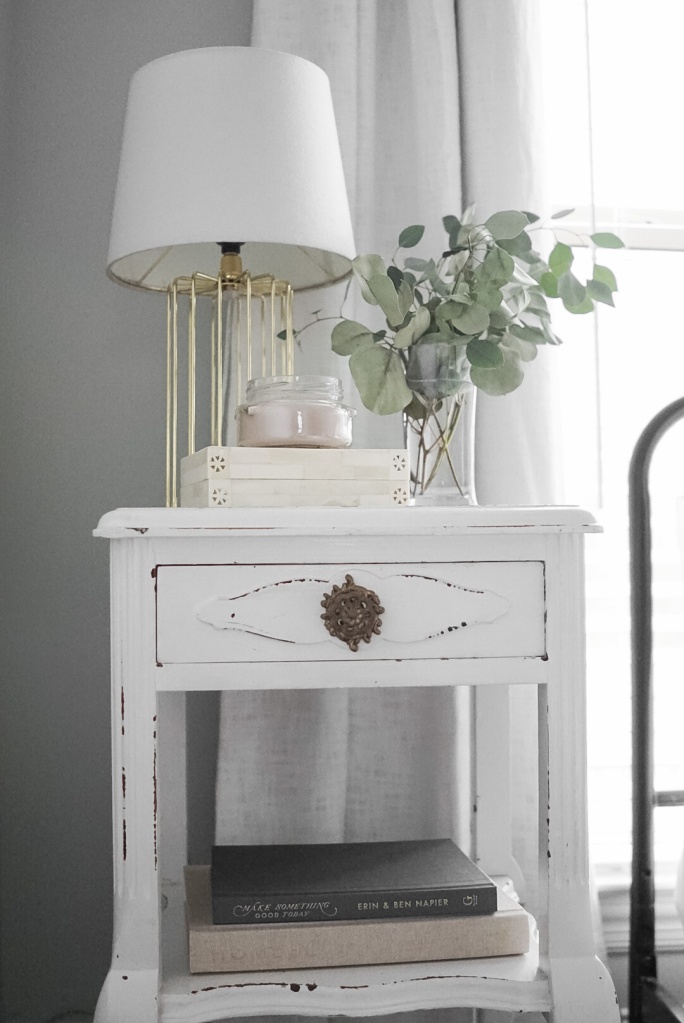


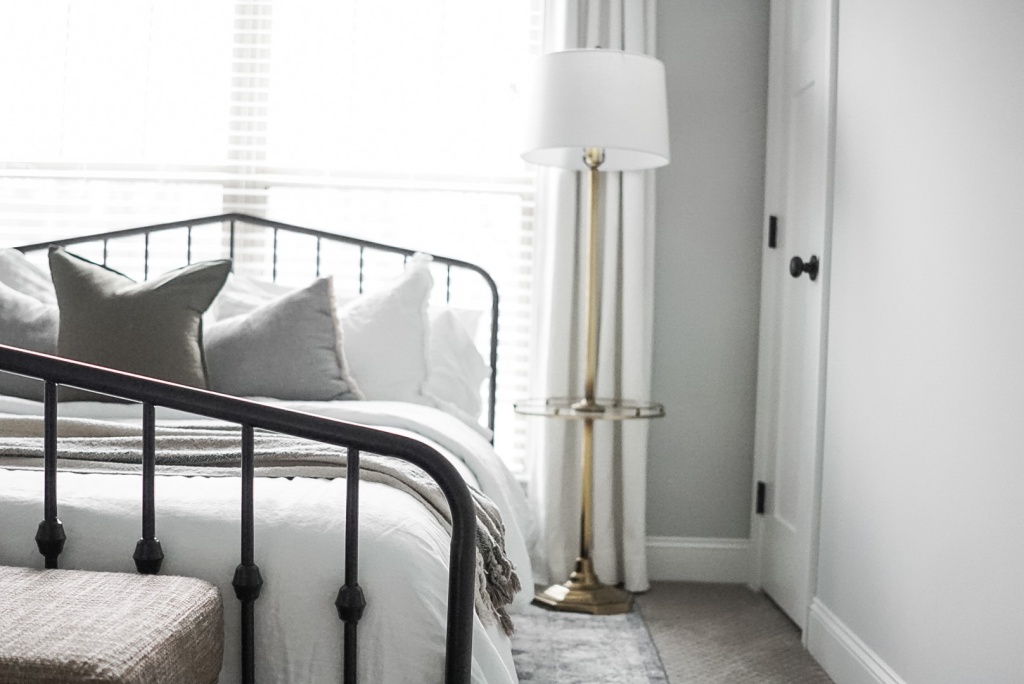
Table Lamp (similar) // Make Something Good Today // Homebody // Nightstand (similar) // Stools (similar) // Bed Frame // Floor Lamp with Table (similar) // Loloi Rug // Linen Duvet Cover (similar) // Long Lumbar Pillow // Olive Green Throw Pillow // Down Pillow Inserts // Fringe Throw Blanket
This is just for fun, but if you love finding deals, these photos are FULL of some really great deals I’ve found over the years, so I thought I would share them with you:
- White French Provincial Style Night Stand – Found at an antique store in high school for just $60 and it has been with me to college, grad school and now our first home as a married couple. I plan on keeping it forever.
- Gold Table Lamp – We found this on clearance at Target a LONG time ago, and it had a hot pink shade 🙈 My mom took the fabric off another shade and put it on the bones of the hot pink shade to make the perfect lamp for my first college apartment! We’re still going strong 6 years later!
- Burplap X-Leg Stools – These are originally from Target, but have been discontinued. I found them on Facebook Marketplace for just $25 each, so I had to grab them! They work great at the foot of the guest bed.
- Metal Bed Frame – This bed in the Queen size retails for $200+ online, but someone sold it to me on Facebook Marketplace for just $20!
- Loloi Rug – Found this 8′ x 10.5′ Loloi rug on TJMaxx.com for just $129!
- Pottery Barn Curtains – Y’all already know the story by now… but still not over the $15 Seaton curtain panel!
- Gold Floor Lamp with Table – Y’all. My mom found this on Facebook Marketplace for $10!! What a steal. I found the shade at Dirt Cheap for $15, making this lamp come to a grand total of $25! It is so nice and heavy.
- Linen Duvet – This is a linen blend duvet originally from Target, but I found it 50% off at Dirt Cheap! It is the Fieldcrest brand that (I think) they no longer sell, but I love it! Linen is the way to my heart.
- Fringe Throw – This is only $25ish at retail price, but I found a used one on Amazon for $15! It came new with tags and in perfect condition. It is big and cozy, and adds the perfect texture to this plain white bedding!
That’s a wrap for how to hang your curtains using drapery pins and ring clips. This is a super easy and affordable way to elevate your curtain game and achieve a neat, professional look for less!
I am curious though… how many of you already knew about drapery pins?! These were all new to me, but I’d love to know if you’ve heard about or used these before, or if I have just been living under a rock when it comes to window treatments 😂
Let me know in the poll below ⬇️
Thank you for reading, and happy hanging!

My Broadway drapes arrive next week!
Two questions:
1. if I need to actually use the curtains daily, (or open and close) do you think this method is still doable? Trying to asses risk of tears.
2. How are yours holding up? Sags or droops at this stage or doing ok?
Thanks for a really well done description!
LikeLike
That is so exciting!! So to answer your questions:
1. I do think this method is still doable, but you would need to be gentle when opening and closing. I think I would be more worried about one of the rings slipping off the hook than a tear though. You could probably eliminate this problem by using a pair of pliers to gently close the hook around the ring clip though. We generally just leave them open because they are in our office, but we have a different set of curtains hung this way in our guest room and they have been used with no issues!
2. I haven’t noticed any sags or droops so far! Again, we don’t actively use them, but the weight of the curtains on the hooks has not caused any sagging.
I hope this helps! Thank you so much for reading and for reaching out 🙂
LikeLike
Are you not using the clip at all? Why are you looping the pin through the eyelet instead of the actual ring?
LikeLike
Hi there! So I am not using the clip at all in this case. Previously, I was using the clips, but I wanted the look of using rings without actually seeing the clips — which is why I decided to use the drapery pins. Generally, you would use rings that contain only an eyelet, not a clip, to achieve this look, but I didn’t want to spend more money on new rings, so I made do with what I had. The curtain tends to hang better if you hook the pin through the eyelet, because the ring is the part that will actually slide along the curtain rod. Hope this helps!
LikeLike
THANK YOU FOR THIS. I couldn’t find anywhere to show how to use pins with hooks.
LikeLike
Awe yay!! I’m so happy this was helpful! 🙂
LikeLike
So you didn’t reinforce the fabric behind the rod pocket in any way before installing the drapery pins? This is what I want to do. I have some polyester faux linen fabric curtains, and am concerned about the fabric tearing when hanging from the pins.
LikeLike
I did not reinforce the fabric, because the two sets of curtains I used had relatively thick and sturdy fabric already. We also do not open and close these curtains a lot. If the material was really thin or you would be pulling on them a lot for any reason, reinforcement might be a good idea!
LikeLike
Thank you for this! Your curtains look perfect. It’s hard to find details in the many posts about this online. How far from the edge of the curtain did you place the hooks that are on the outside edges?
LikeLike
Thank you so much! I’m hope this post was helpful! I put the two hooks on the outside edges in the center of the edge seams. I hope that helps 🙂
LikeLike
I also found a great deal on 2 84” Pottery Barn linen panels. I still don’t understand how to use the plastic lines on the back. Did you use them?
LikeLike
So the little plastic lines on the back are for a different style of drapery hooks! I didn’t use them initially, but last year I went back and replaced the drapery pins with the pleating hooks. I feel like they are more secure and hold the weight of the curtains a little better since mine were heavy. But you definitely don’t have to use them! 🙂
LikeLike
Thank you. I ordered some hooks. I’m crossing my fingers I can figure it out.
LikeLike
Hello, and thank you for writing this post. There is so much helpful tips to read I’m just so excited! I am wondering though would I be able to use the Belgian Flax Linen Rod Pocket Sheer Curtain or the Emery Linen Sheer Curtain or any sheer that would work to achieve this look with the black rod and black rings. I need it to be sheer as I am combining it with cellular shades I would like a good quality sheer but I’m not sure what would be good.
LikeLike
I would say if you want to do this with sheer curtains, they would need to be good quality and a little thicker than your typical sheer. I would also say using more hooks and making the spacing between them a little smaller could help. You could also add reinforcement fabric or iron on pleating tape to the back of the rod pocket to help!
LikeLike
Great post! Exactly what I was looking for. A drapery wand could be used to help avoid tugging and pulling on the drapery panel when opening and closing. A wand would also help with any stains or oils from fingers transferring to the drape creating a stain over time. Also, I believe there are rings made specifically for drapery pins. Thanks again for the post!!
LikeLike
Thanks so much! The drapery wand is a great idea! They do make rings specifically for this, but I didn’t buy any because I already had these. That would make the process a lot easier though to just slide them on! I’m glad you found this post helpful 🙂
LikeLike