Wow, this was quite a journey. As you know, I love mini things. I did some looking around at what others have done and there are more than a couple of patterns and ideas for the baby sock. Until you actually knit something, you never know what’s going to come out of your machine. I can tell you what my results for the baby socks look like, so you can have some idea of where to start when you do your own experimenting.
The Pattern
I found a free pattern from rox4sox that I followed. My goal was a 5ish” circumference and a 4ish” foot because I had measured commercial socks (I don’t have babies to test anymore lol). I figured this size would get me in the ballpark of a walking baby size. Here are my results on a 60 needle cylinder with a 30 needle ribber with a bit of tweaking:

The red sock is the original pattern. That is a 5 row foot, 1 x 1 ribbing throughout. The foot turned out to be 3.5″ measuring from toe to heel. The circumference is about 6″
In the blue fair isle sock at the top, I used 4 less needles in the short row heel to see if I can get a better shape. I was pleased with this shape of the heel for little feet The one on the bottom I tweaked the heel again – left only 21 cylinder needles in work, and decreased down to 7 cylinder needles. I like that heel even more, and the circumference is a nice 5.5″.
What I was really distressed about by this point was the toe: it’s huge. If I try and do the same treatment to the toe as the heel, there are 2 problems:
1. I have to kitchener stitch ribbing (not as easy as closing up plain toes), and

2. I get “bunny ears”. No matter how I stitched it up, I got two little nobby bits on the sides of the toe.
The picture on the left is my botched job at grafting – I didn’t realize I was going side-to-side instead of top-to-bottom!
I tried different techniques and lots of swearing from this point. I tried short rowing from the toe up like a regular adult pattern but with less needles – still got bunny ears. I tried toe up, decreasing and rehanging stitches. What I ended up with is to leave the toe that huge, and admit defeat.
The Final Decision
The smallest sock I can make with the 60/30 that looks proportionate to an adult sock is on the left. They are knit like an adult sock – toe up, but with a 15 row foot and shorter heel. This makes a 5″ long foot with a 6″ circumference, so It is about a kids’ shoe size 6-10.


A note about sizes: Sock sizes are not the same as shoe sizes. One day I may post about the loooong explanation as to why, but the bottom line is that most people know their kids’ shoe size, not their foot length. Since socks can stretch, and the difference between shoe sizes are often .2″, a 5-6″ sock can fit a pretty big range of shoe sizes.
But Wait…

So let’s go back to that fourth sock experiment is in the picture above, and also to the right. That was another suggestion I had read on the internet – use every other needle. The thinking was that if you have half the needles, you’ll have half the size of a regular cylinder. This was the fastest and easiest sock I made, but the circumference was all wrong. It was a whopping 6.5″. I’ll give you a hint though – I was on the right track.
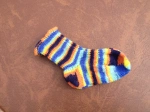
Check it out – this is what happens when you use every other needle, add the ribber AND use every other ribber needle – it creates a 1×1 rib spaced farther apart. When they are all washed and dried, they are an exactly proportionately smaller sized sock at a beautiful 5″ circumference and 4″ foot. When stretched, they are holey, but that doesn’t show on a smaller foot, and the ribbing hugs the foot nicely. I (finally!) got a model to test it, and this is what they look like on an 8 month old:


My Conclusions:
These may have less yarn in them, but they’re the same amount of work. The best way to get a non-walking baby sock on your 60/30 is with the “Every Other Needle” method which is actually quicker. One thing about working this way with the machine is that stitches drop more often being so far away from each other. Watch out for that.
If you’re making a sock for an older child always use the ribber to get the circumference right. I recommend the ribber for all children’s sizes right up to shoe size 6, (which is a Women’s shoe size 8).
None of this information is difficult to find in other places and there are a TON of helpful people with Sock Knitting Machines out there. What I hope is that the pictures will help you visualize the result better if you ever consider making them! And I’ll leave you with one final picture:

