After having done a couple walk-throughs of this pizza in my Instagram stories in the past few weeks, this pizza’s name kinda stuck—I’ve been seeing people puzzle together my recipe and post it to their own IGs as such. I just called it Sunday Square because I happened to bake it on a Sunday and it’s a “square” pie. And I like alliteration. You don’t have to make this on a Sunday, of course—in fact, you need to make the dough at least a day ahead, so start it Saturday morning if you hope to cook Sunday. Without further ado, and by popular demand, here’s my Sunday Square recipe.
Notes
Actually, I am going to make some ado. Here are some notes to hopefully pre-empt some questions…
Baking Steel: You can try this without a Baking Steel, but I’ve found that a screaming-hot preheated Steel really accelerates the cook and gives you a good hard bake on the crust. You cook the pizza in the pan, which is placed on the Baking Steel. If you have a pizza stone but not a steel, this would probably work, but YMMV—as always, look for visual cues to doneness first, and use stated times as a rough guide.
Black steel Sicilian pan: I have a nice heavy rolled-steel pizza pan that I bought at Bari Equipment on the Bowery in NYC. I believe it’s from Winco, and it has been great. BUT, I’ve heard reports of the black nonstick coating coming off the Winco pan—and the Amazon reviews are less than stellar, mentioning the same thing. If you have a restaurant- or pizzeria-supply store nearby, maybe try looking there for either a non-Winco pan, or find a Winco pan whose coating looks solid.
“Can’t I just use an aluminum half-sheet baking pan?” If you can’t find a black steel Sicilian pan, you can cook your pizza in an aluminum half-sheet pan. Just make sure it’s well-seasoned first! I prefer steel, for even heating, but it can be hard to source, depending on where you live.
Rack and Baking Steel position: I place my bottom rack about one-third of the way up from the bottom of the oven. To be honest, I’ve never tried it anywhere else. It might work better somewhere else, but this is where I put it and I’m happy with my results.
You can find many of the tools I use here on Amazon
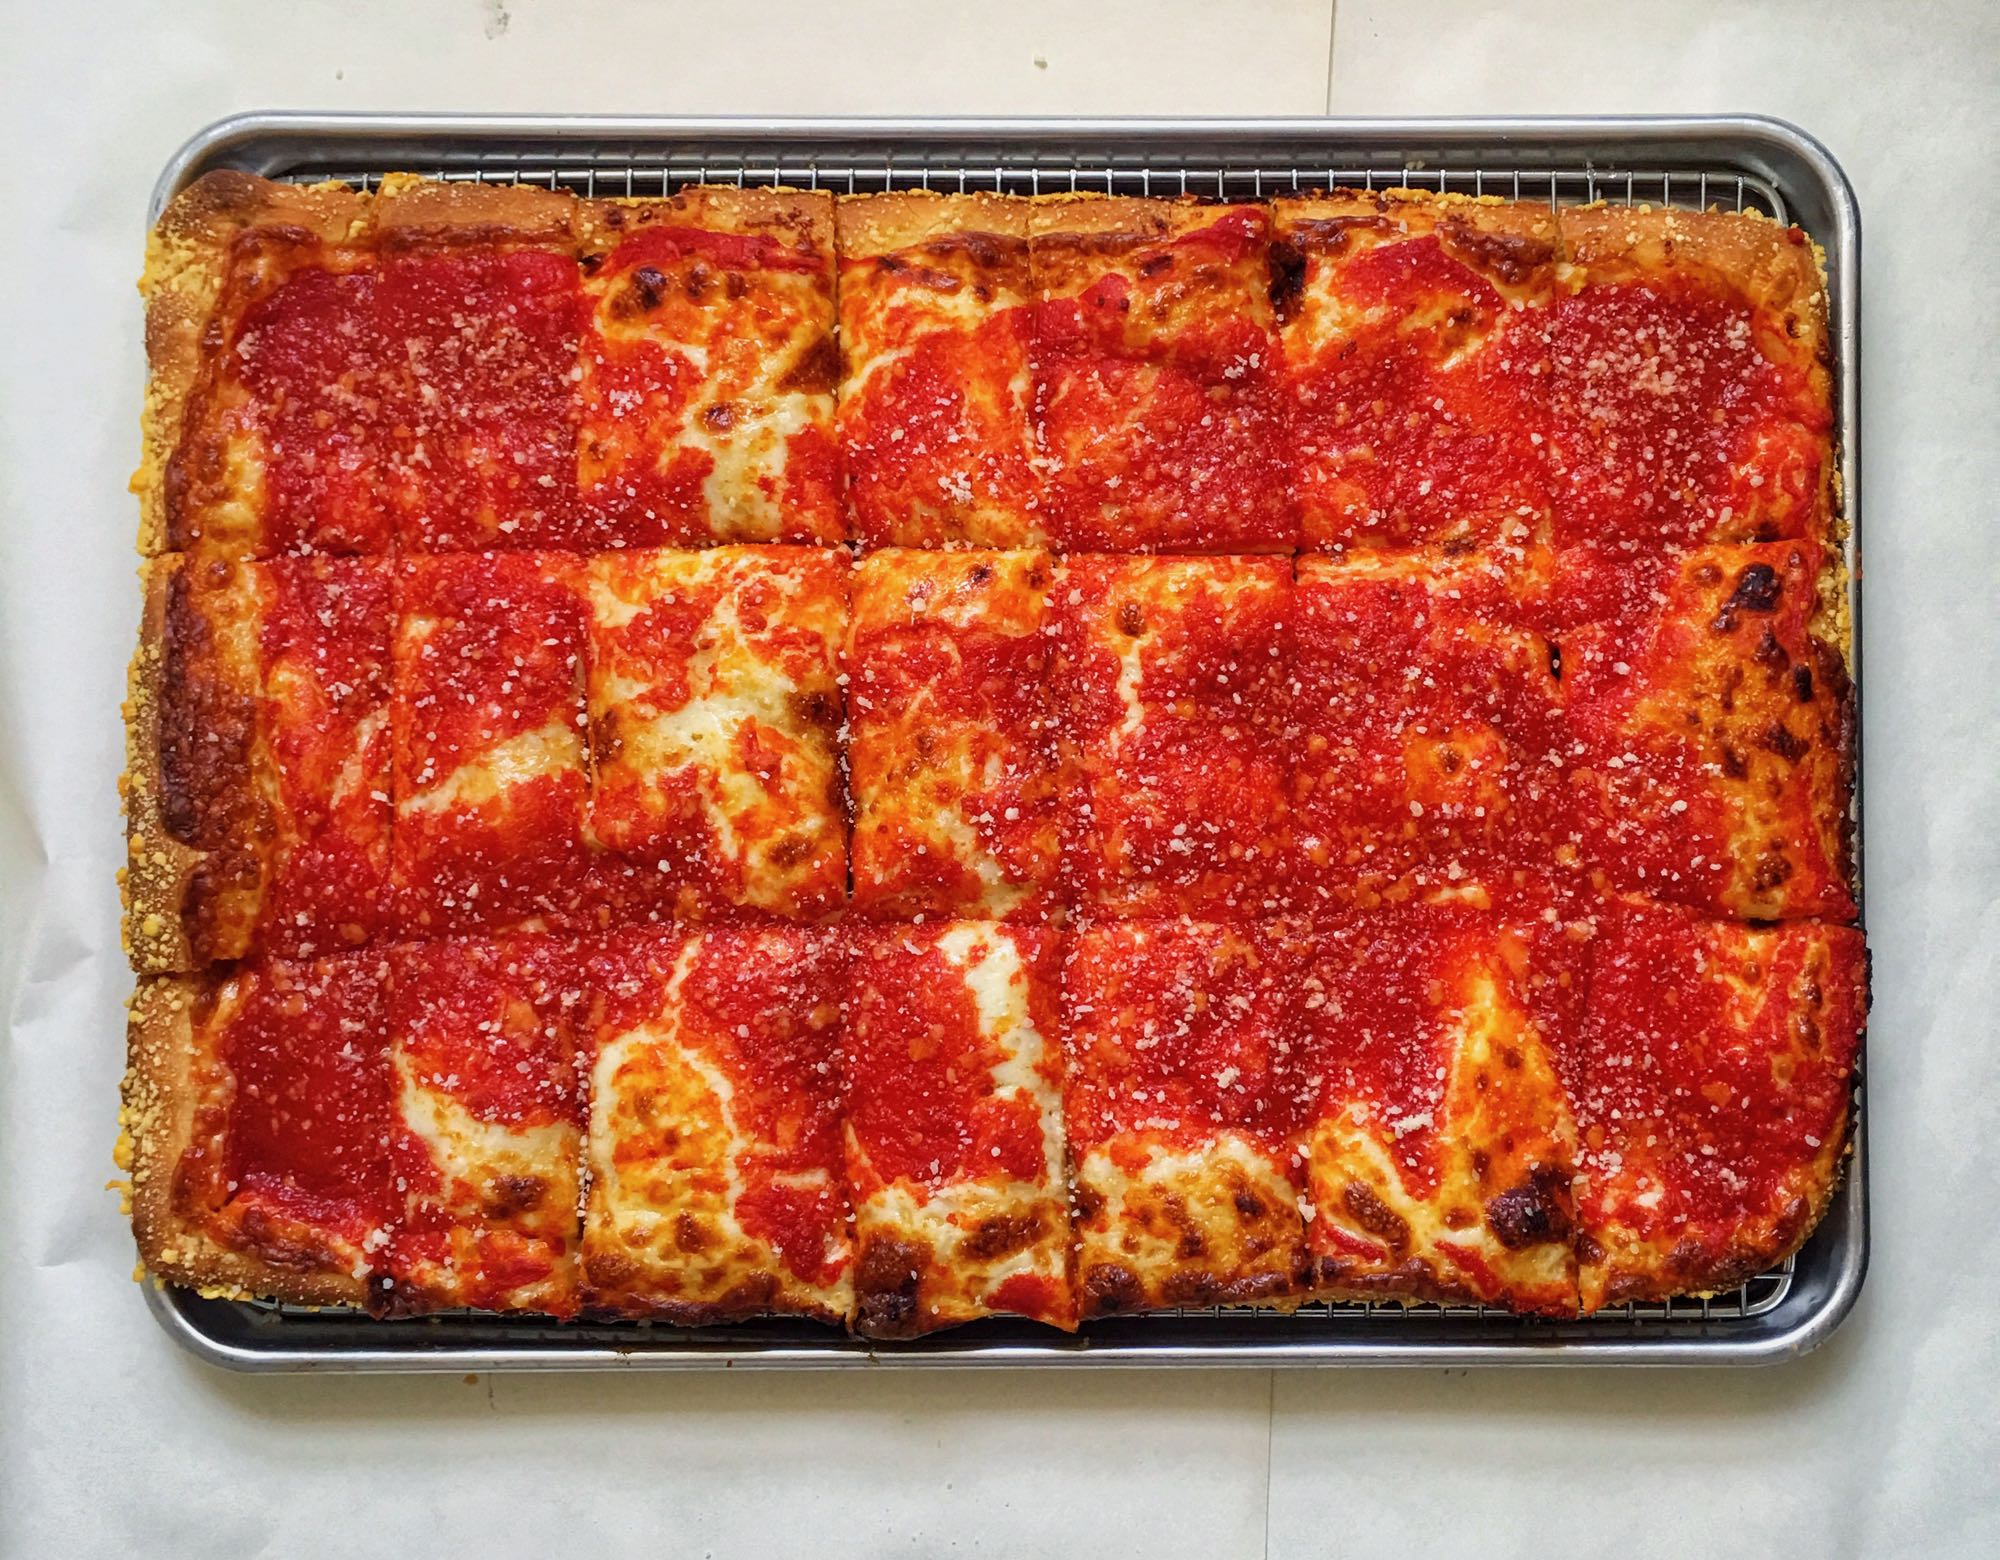
Cheese first, then sauce: This is how L&B Spumoni Gardens does it. Sauce on top protects the cheese from burning during a relatively long, hot bake and leads to a melty layer of oozy mozzarella just right for cheese pulls.
About the mozzarella: I use Boar’s Head low-moisture whole-milk deli mozzarella—the kind used for sandwiches, which I get from the deli counter at my nearby grocery store. I just ask them to slice me up a pound of it. The recipe calls for 12 ounces, but it’s nice to have extra just in case. I’ve never asked for a prescribed thickness—the standard “sandwich thickness” (about 1/8-inch [3mm] works fine). You can also slice your own favorite whole-milk mozzarella for this. The key is using slices, which help to evenly cover the dough and give you an L&B thing.
About the grated cheese: I don’t care which you use. I use whatever I happen to have on hand. (Usually the Parm-Romano blend from Trader Joe’s.) If you don’t like putting it on pre-bake, that’s fine. Don’t. It hasn’t been until recently that I realized a lot of pizzerias don’t put an aged grated cheese on pre-bake. I grew up doing it that way, and I take a heavy hand with it. And I put it on post-bake too. 😂 Like almost everything else about pizza, this is another area you can tailor to your liking.
Sauce: I link to two different sauces. Lately I’ve been using the Simplest Pizza Sauce Ever version, which is the sauce a Neapolitan pizzeria or a New York coal-oven place would use. In this application it’s more reminiscent of a coal-oven joint. I’ve also used the Super Simple Seasoned Sauce on previous squares, and that’s good, too, if you like more of a 1960s “pizza parlor” flavor. If you have a recipe you like, use yours!
My inspirations: This is based partly on J. Kenji Lopez-Alt’s Prince Street Pizza clone, which is a same-day project. It’s a great recipe, but for whatever reason, if I didn’t time it just right, I found my attempts collapsing under the weight of the toppings. In an IG DM with @joe_rosenthal, he suggested trying a cold-ferment to help develop stronger gluten. So that’s what I did. To that end, and aiming for an overnight bulk rise, I cut the amount of yeast in half.
I’ve also dropped in some diastatic malt powder, which helps with browning. (And maybe it’s just a placebo effect, but I swear it gives my pies a slightly better rise.) I’ve been using DMP at home since Noel Brohner (aka @slowrisepizza) recommended trying it several years ago. Not long after he did, Tony Gemignani dropped his Pizza Bible cookbook, where he is all up on DMP as a sort of secret weapon. If you don’t have it on hand, you can order it online—or you can leave it out. I’ve gotten fine results without it. (And besides, most flour you’ll find at a grocery store is “enriched”—meaning it’s malted already.)
Anyway, I think that’s enough blabbing, don’t you? If you have any questions, hit me up on my Instagram: @akuban
Sunday Square (Sicilian Pizza)
Equipment
- Baking Steel
- Black steel Sicilian pan
- Half sheet pan (13×18") fitted with corresponding cooling rack
Ingredients
- 1 portion
Sunday Square Pizza Dough - 1/4 cup olive oil (40 grams)
- 12 ounces thinly sliced low-moisture whole-milk mozzarella (340 grams // about 1/8-inch/3mm thick)
- 2.5 ounces grated Parmigiano, Romano, or Parm-Romano blend (70 grams)
- 16 ounces The Simplest Pizza Sauce Ever (Super Simple Seasoned Sauce also works well)
- Dried oregano, to taste (optional)
- Fresh basil leaves, to taste (optional)
- Grana padano, to taste (optional)
Instructions
- About 5 hours before you plan to bake your pizza, remove the dough from the refrigerator and let it come to a cool room temperature (~65ºF/18ºC), about an hour.Meanwhile, pour 40 grams (1/4 cup) olive oil into your black steel Sicilian pan, and spread it around, into corners and up sides of pan.If dough is in sheet pan, remove lid or plastic and turn sheet pan of dough upside-down over the Sicilian pan. Hopefully the dough will slowly release and drop into the Sicilian pan. If not, use a bench scraper to gently pry it out.
- When dough is in oiled Sicilian pan, flip it over to coat it on all sides with oil—trying to maintain rectangular shape the entire time. Press it out as evenly as possible into the corners of the pan.If the dough is snapping back, let it rest 10–15 minutes and try again. The point of cold-fermenting it in the sheet pan is to give you a head start on making a nice, easy, extensible rectangle shape.Temperature plays a role in ease of stretching, too. Cold dough is very hard to stretch and shape. Hence the warm-up in the sheet pan before transfer to the Sicilian pan.
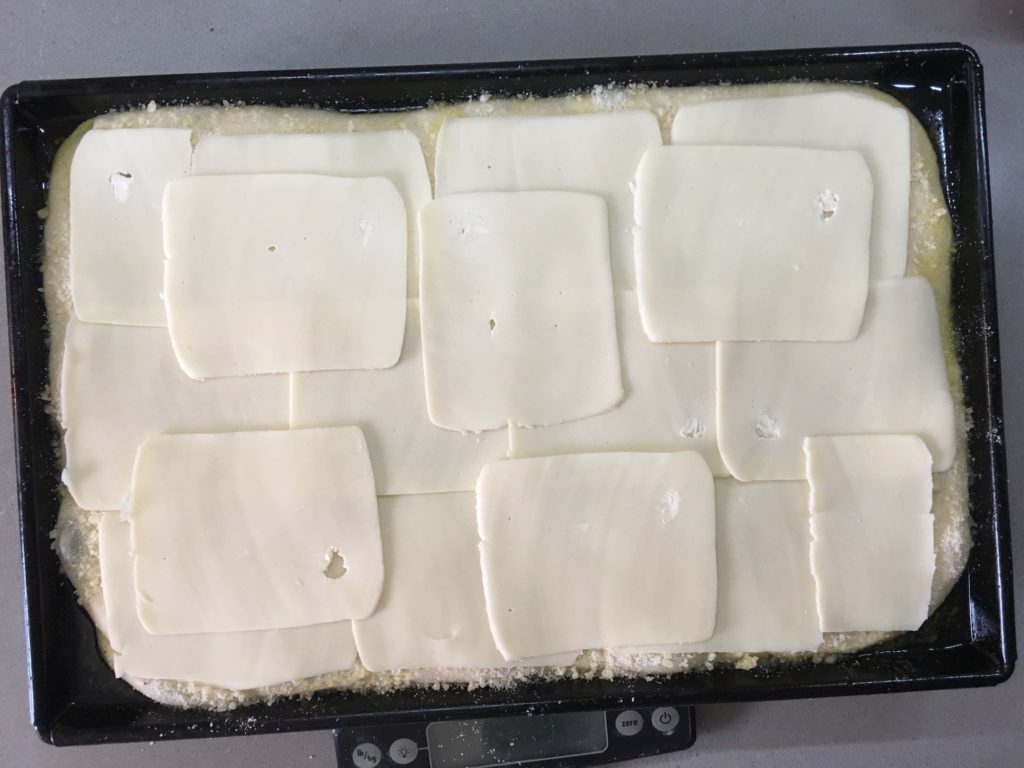
- Let the dough rise in the pan until it's near double in bulk—it will be near the rim. Pay attention the first 30–45 minutes to see if it's receding from the edges. If it is, gently stretch it out as much as you can without handling it so much or so roughly that you de-gas the dough.When dough is near the top of the rim, sprinkle it with half the grated cheese, going heavy with it around the edges. This isn't a Detroit-style pizza, but I like a nice Parm-y edge.
- Lay sliced mozzarella atop dough, covering dough in its entirety but for 1/4" around the edge. (This isn't a Detroit-style pizza, after all.) I like to double-layer a few extra slices on for extra cheesiness here and there.
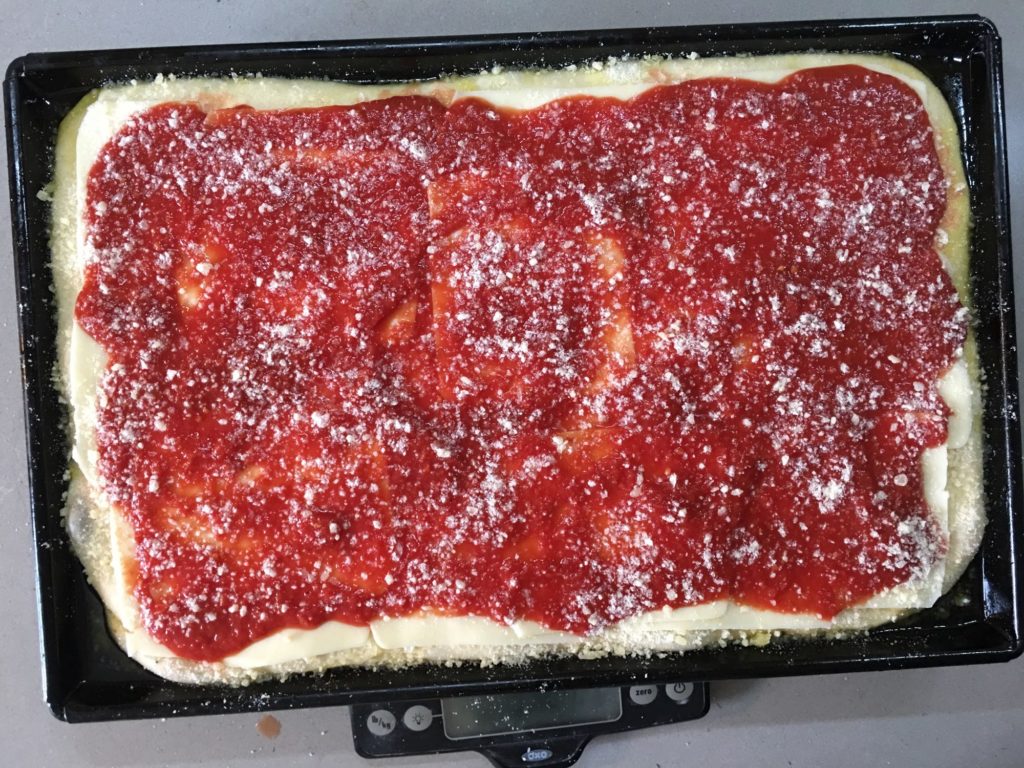
- Spoon sauce on and use the back of a large spoon or ladle to spread it around. (I actually use an Asian soup spoon; its flat bottom is great for this purpose.) Sprinkle on the remaining half of the Parm/Romano.
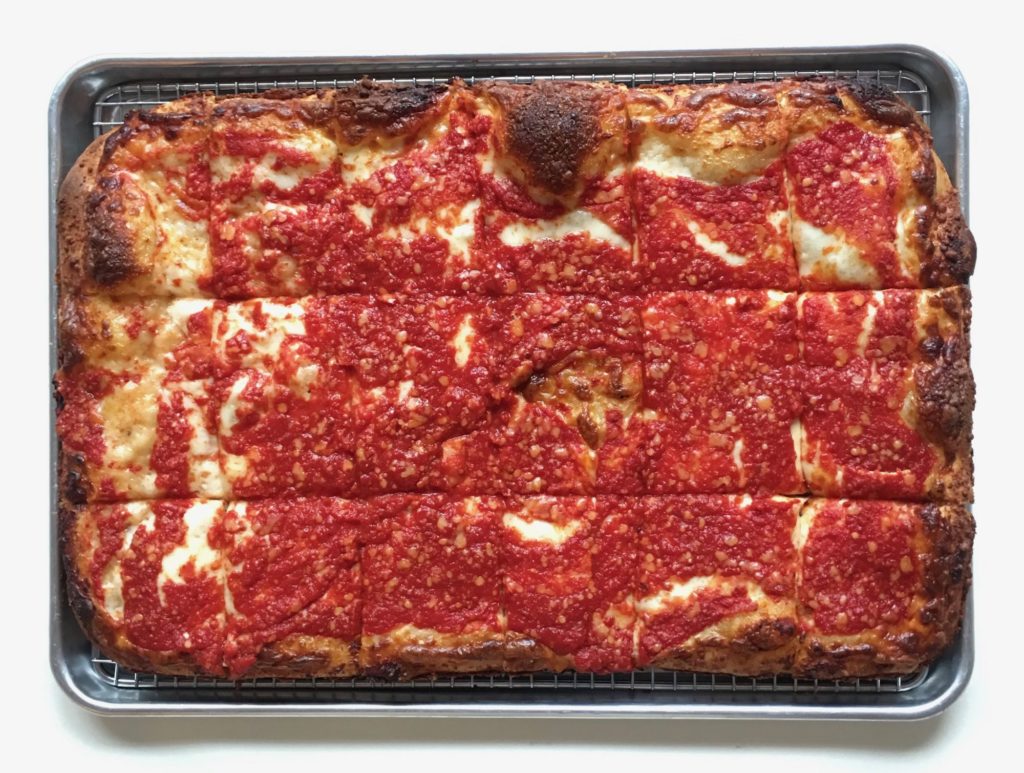
- Place your panned-up pizza directly on the Baking Steel, and bake until dough edges are dark brown and pulling away from pan edges, 10–12 minutes, rotating halfway through.
- Remove pizza from oven and, using a spatula (or two), pry it from the pan and transfer it to the half-sheet and cooling rack.Allow to cool a few minutes and slice.Optional: Swirl on some olive oil, sprinkle on oregano, scissor on some fresh basil, and grate some fresh grana padano over it.